The UC Davis Good Life Garden blog has moved!
You should be automatically redirected in 5 seconds. If not, visit
http://goodlifegarden.ucdavis.edu/blog
and update your bookmarks.
Showing posts with label organic. Show all posts

Thursday, September 16, 2010

We Got Mildew Yes We Do! We Got Mildew, How 'Bout You?

Here is an example of squash with just a few spots of powdery mildew.
 As tends to happen in the late summer, our squash is suffering from powdery mildew.  This problem is pretty easy to identify;  our plants will look like someone tossed some baby power all over them.

It starts small and then just gets worse if left to proliferate.  Powdery mildew sends little tubes into leaf cells to suck out their contents, killing the cells in the process. As leaf cells die and the leaf's surface becomes covered in the white fungus, photosynthesis is reduced and leaves may be lost. Crop volume and eating quality can be reduced.

Here the mildew has been left to keep growing!

So how do you get rid of it organically?  Well, there are quite a few options. 

PREVENTION
According to our own UC Davis Integrated Pest Management, prevention is always the best way to avoid this problem.  In other words, if your garden is prone to this kind of issue, next time you plant squash, melon, pumpkin, etc., be sure to start with a resistant variety.

CULTURAL PRACTICES
You can avoid powdery mildew my making sure your plants receive plenty of sun.  (Because of the location of these plants near the South Building of the Robert Mondavi Institute, these plants do get more shade than others.)  Also be sure to:
  • Provide good air circulation by not crowding your plants
  • Rotate squash beds on a minimum three-year cycle to reduce the chance of a fungal buildup or reinfection from one year to the next.
  • Pull up infected plants and burn or bury them.
We got the dummy whammie--the plants need more sun and they are not disease resistant varieties--so now what?

ORGANIC FUNGICIDES
According to UC Davis Integrated Pest Management, once you have the powdery mildew problem, oils, like neem oil,  tend to work better at eradicating the issue once you have it rather than preventing the problem. 

You may also want to try a biological fungicide like Serenade Disease Control Concentrate, but like UC Davis Integrated Pest Management states, "While this product functions to kill the powdery mildew organism and is nontoxic to people, pets, and beneficial insects, it has not proven to be as effective as the oils or sulfur in controlling this disease."

HOME REMEDY
For those of you interested in home remedies, it seems that you can also try making your own spray of one part skim milk to 9 parts water.  Skim milk works just as well as other types of milk--whole, low fat etc., but no fat means no odor!  Read more about this research finding here:  Using Milk to Control Powdery Mildew.

Did you get the gift of powdery mildew this summer?  If so, what did you do to get rid of it?  Let us know!

Thursday, September 2, 2010

Eggplant eggstravaganza!

imperial black beauty eggplant variety

Eggplant is definitely one of our favorite vegetables here at the garden.  Not only are they pretty, coming in a variety of shapes, colors, and sizes, but they are also incredibly delicious!  This season we are not only growing the familiar chunky purple variety (imperial black beauty), but also the Rosa Bianca and white "snowy" eggplant.

Hearty and scrumptious in so many different types of food - stir fries, lasagna, baba ganoush... I could eat it every day!  At only 27 calories per cup cooked and packed with pigments like nasunin which may help protect brain cell membranes from oxidative damage, eggplants seem almost too good to be true!  They are also high in fiber, potassium and Vitamin B6. 

Want to learn more about eggplant history and health benefits?  Visit our website or whfoods.org.

Check out the bounty from the garden this week!  Pictured here are the imperial black beauty and snowy eggplants, as well as maglia rosa tomatoes in front, black and brown boar, pink Berkeley tie dye and green zebra tomatoes, dark star zucchini, lemon cucumber and reve scallopini in back.
This is one of my favorite recipes for eggplant: sausage and eggplant stuffed pasta shells in tomato basil cream sauce.  It's decadent and time-consuming to make, but a crowd-pleaser every time!  And now is the perfect time as  eggplant, tomatoes and basil all ripe right now!  (Recipe tip:  I leave the cream out of the sauce as the dish is rich enough with the sausage, eggplant and variety of cheeses.)

Eggplant can be a tough nut to crack in the kitchen though.  Grilled?  Sauteed?  Roasted?  Last night I sliced an imperial black beauty roasted it in the oven with some olive oil, sea salt and pepper.  I ate it on toasted wheat bread with melted mozzarella, heirloom tomatoes and arugula, and it was delicious!  But the roasting took a very long time!  It is hard to wait when you know how yummy it will be!

In the past I've sauteed them, but they seem to soak up too much oil.  Do you peel them? Do you eat the skins?  The skins apparently hold much of the nutrients, but are often tough and, if grown non-organically, sometimes covered with wax which traps in pesticides--in this case peeling seems necessary.

Food experts out there: we need your help!  How do you prep and cook your eggplant?  What are some of your favorite recipes?  We need some more ideas for this appetizing edible!

Wednesday, September 1, 2010

Website Wednesday: Edible Yardworks


Ever walked out to your garden with a big to do list full of great ideas, only to find yourself standing in the same spot ten minutes later thinking "Where do I start?" Well we think we may have found an answer to that question. The Edible Yardworks website is a great place to look for a starting point for various gardening projects. And did we mention it is a Northern California specific webpage! This website is an amazing resource for people looking for that starting place.  It has 15 different 'How-To' topics for those interested in finding out more about everything from composting to mushroom farming.

The creator of this site, Stacey, also offers private classes on how to grow organic and cook great meals. Even better, her price for a class with more than three students is $15 per person! We think that is so reasonable, so, for those of you in Northern California get some friends together and make a night of it!

Stacey also posts several great video from very reputable sources. Her videos are in the "Case for Edible Yards" tab at the top of the page which has 9 reasons why being sustainable is so important including Biodiversity, Industrial Agriculture, and Climate Change.

Stacey uses a clip from this movie in the Industrial Agriculture section

Monday, August 30, 2010

It's fig day!

The first fig was ready for harvest today!  It was the "brown turkey" variety and its skin was a pretty purple color.  In the garden I was not sure if the fruit was ready to be picked, but it was soft to the touch, and luckily when we cut into it it was perfectly ripe, juicy and sweet. According to the California Rare Fruit Growers website figs must be allowed to ripen on the tree as they will not ripen if picked when immature, and you will know they are ready when the fruit is soft and begins to bend at the neck.  I also found out that fresh figs do not store well; they will only last 2-3 days in the refrigerator, so when you pick them, make sure you are ready to use them right away!
the first fig of the season
the fig was perfectly ripe and very sweet
If you are lucky enough to have a fig tree in your yard there are tons of great recipes-figs are versatile as they work well in both sweet and savory dishes.  Click here to visit the California Fig Advisory website - they have a great recipe book for "Fig Fest 2010" that includes fig and orange beignets, Gary's fig and pecan cinnamon rolls, and causa con salmon with fig compote.
The brown turkey fig tree is only about 5 feet tall right now
Want to plant a fig tree in your yard?  They are picturesque, perfect shade trees that grow up to 50' tall but are usually kept around 10' to 30'.  Keep in mind also that they require full sun all day to ripen the fruit, need a lot of space and will shade out anything growing beneath them.  For more detailed information visit the UC Cooperative Extension fruit and nut research information center fig fact sheet.

Here are some other fun fig facts from the California Fig Advisory Board website:
  • Figs provide more fiber than any other common fruit or vegetable.
  • Although considered a fruit, the fig is actually a flower that is inverted into itself. The fruits are the seeds or "pedicellate drupelets" found inside.
  • Figs contain a natural humectant -- a chemical that will extend freshness and moistness in baked products.
  • California dried fig production has averaged 28 million pounds over the last five years. All dried figs harvested in the United States are grown in California's Central Valley. 

Monday, August 23, 2010

Another Lemon Tree Update!

Our struggling lemon tree is producing up a storm!  Last April we let you know we pruned our Meyer lemon tree back HARD in order for it to adjust from its recent relocation/transplant.  See the blog post:  Lemon Tree UPDATE! for a quick review and some disheartening 'before' photos. 

The little guy must be happy now...just look at all the lemons we have to look forward to come winter!  Patience is truly a virtue when it comes to creating happy environments for your edibles.  If at first you don't succeed, try, try again!

Friday, August 13, 2010

Corn from our garden: BEFORE and (almost) AFTER

I've said it before and I'll say it again!  I love before and after photos from our garden so I thought I'd share some with you too!

To learn more about growing your own corn access this helpful download about corn from the UC Davis Vegetable Research and Information Center.  This and many other helpful links and resources can be found on the California Master Gardener Program website called California Garden Web.

To learn more about the corn varieties we have growing in the garden visit the corn page on our website.

Here is the corn on June 30 about a week or so...cute!  (Can corn be cute?)  It's hard to believe it will ever amount to much!
Here you can see a couple rows.  Some of the seeds did not germinate.

Here is a photo of that same corn, only this was taken just over two weeks later on July 16.  They grow up so fast don't they?
Now you can see the corn is filling in despite the few that did not germinate.

This is what they look like almost a month after (August 12, 2010) the photos that were taken just above on July 16.
We have two patches of corn growing in our 'Malting and Brewing Bed' just outside of the brand new Brewery, Winery and Food Processing Facility.  Perfect fit, right?
Here is a close-up of the corn blossom!  This is a really interesting variety called 'martian jewels' corn.  The kernels are white, but the cob is a rich purple; the flavor is hardier and richer than most typical sweet corns.

Monday, July 26, 2010

Blog Recommendation Monday: The Casual Gardener


Shawna Lee Coroando is the author of Gardening Nude (a self help book on how gardening can help you strip away the stress of your daily routines), a syndicated newspaper columnist, health and green living guru, and finally, blog writer extraordinaire. The Causal Gardener is the perfect name for her blog because she writes articles that don't preach about the "right" way to garden.  She sticks to giving her readers tips and ideas to help expand their gardening skills without stressing over perfection.

Shawna keeps track of what works and what doesn't season by season so in her articles she'll talk about how what she did last year was a little better than what she did this year and why (or vice-versa). She also writes book reviews; her latest is on The Complete Idiot's Guide to Composting which she thinks should be in everyone's library. Her blog posts always include big pictures and lots of videos for you visual learners out there. You will also find lots of tips on how to reuse or recycle objects in your garden.

On July 20, 2010 Shawna gives her readers an update about the process she went through to convert her front lawn into a vegetable garden; it's very inspirational and you can read it here: "A Sustainable Vegetable Garden - In My Front Lawn."  She even gives us a peak into her design process by including a "bird's eye view" of her final product  (See photo on the right.), as well as  a corresponding "gardening by numbers" plant list!  Isn't that great! How many times have you wished that someone knowledgeable would just tell you what to do?   I know I have and the answers are here!

Thank you Shawna for providing your readers with such thorough garden reporting, and of course, for not making us feel imperfect in the process!!

Thursday, July 22, 2010

Tomato Staking 101


At the UC Davis Good Life Garden we stake our tomato plants rather than using cages to provide support.  Either way is fine, but we do get a lot of questions about how to go about training your tomato plants using the staking method as it does look pretty neat and it makes harvesting your crops a bit easier.  In order to answer these questions we have put together another "Gardening Along with Arlene" flyer on the topic which you can download here. 


 For more details, take a look at these demonstration videos.


Friday, July 16, 2010

Amaranth Overview

Amaranth is a beautiful plant! Take a look at the spectacular blossoms from the amaranth variety 'love lies bleeding' produced during last year's summer crop.


But growing these hearty show-stoppers in your garden may not be your first choice if your goal is enough production to feed your family, but WAIT! Did you know that these plants produce tasty greens you can sauté just like you would spinach? And, from what I've read, the greens don't cook down as much as spinach either. (If you've ever sautéed spinach then you know how unnerving that can be! You never have enough!)

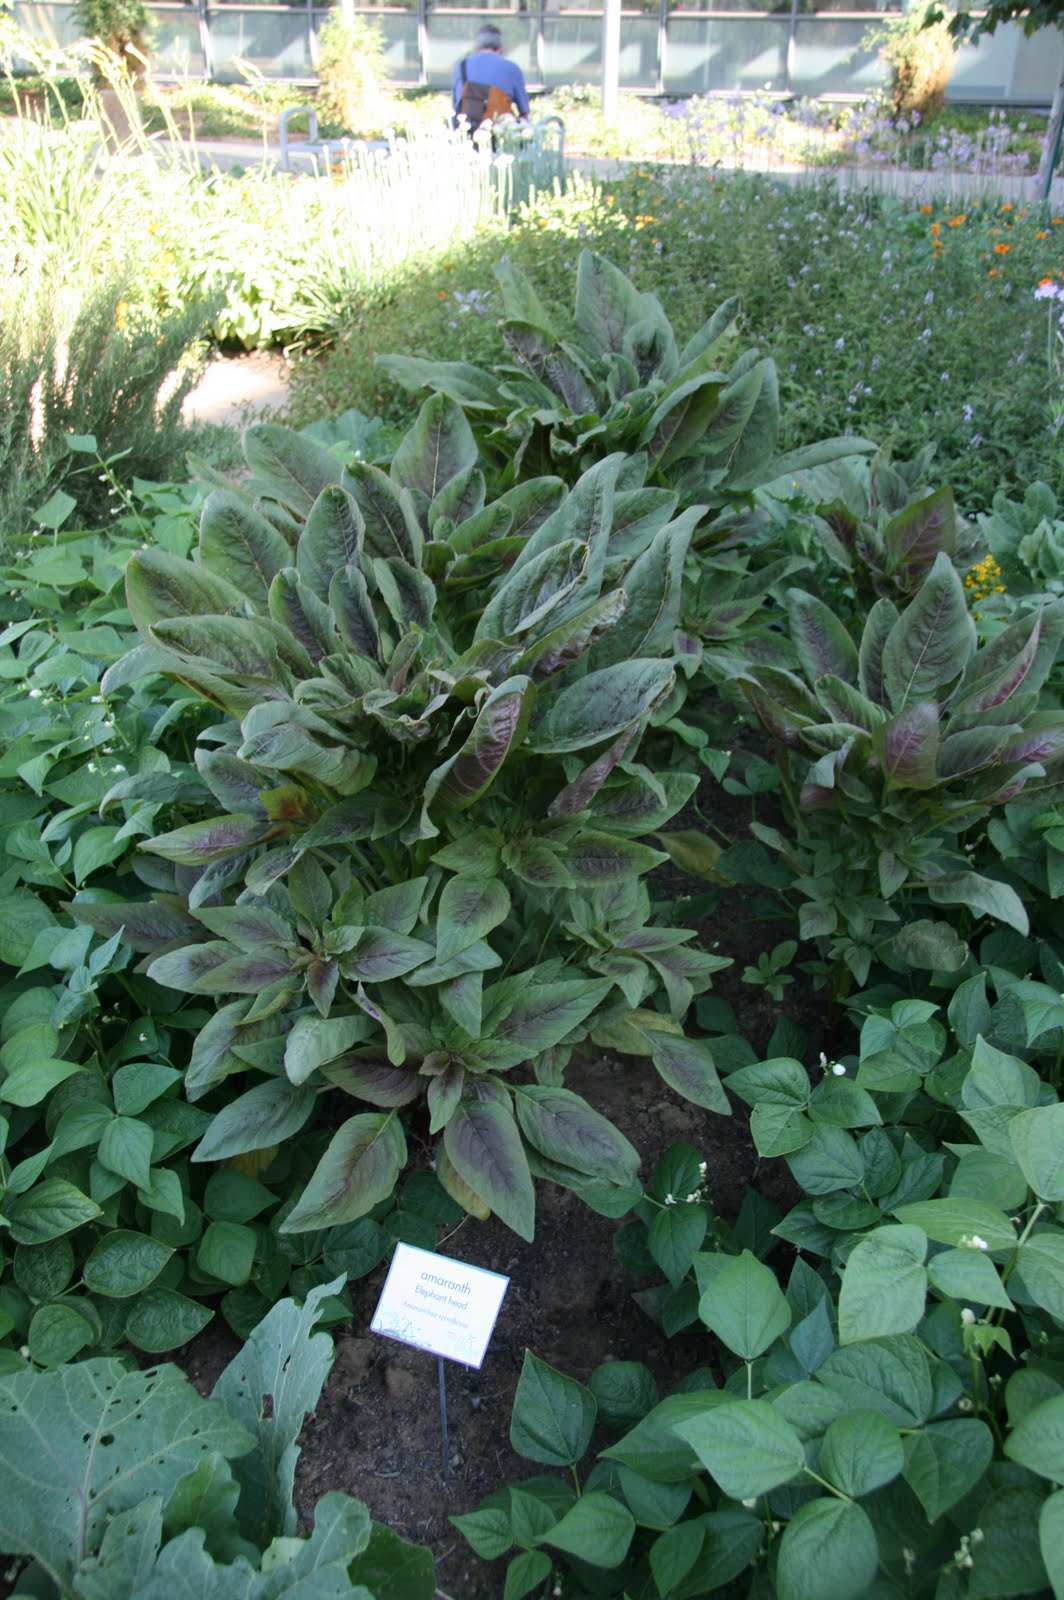
Here are three varieties we are growing this summer at the UC Davis Good Life Garden...

Elephant Head Amaranth


Hopi Red Dye Amaranth


Love Lies Bleeding Amaranth (see photo above with blossoms)


The photo directly above shows how our gardener Arlene is keeping the plants bushy in order for them to produce more greens. Basically she will keep topping the main stalk of the plant. (That white spot in the middle of the photo is the tip of the topped stalk.) This process will slow the plant from sending out the lovely blossoms packed with grain, but at the same time encourages the plant to sprout more of its bushy, tasty leaves.

If you miss sautéeing winter season greens, give amaranth greens a try for the summer and fall!

Wednesday, July 14, 2010

Tomato Troubles: BLOSSOM END ROT


Tomato blossom end rot is annoying to say the least, but fear not! You are not the only one who has this issue!

Today's entry is an answer for Kate, one of our beloved fans, and addresses the problem that she is having with her tomatoes. Above you will see a photo of her poor tomato. Most of her tomatoes have a hard brownness at their ends. Kate has correctly identified the issue as a lack of calcium, but wants to know what it is and how she can fix it.

First of all, it looks to me like you have a classic case of tomato blossom end rot. The University of California Division of Agriculture and Natural Resources describes the problem in detail in their free publication "Growing Tomatoes in the Home Garden:"

Problem
  • Water-soaked spot on blossom end of fruit enlarges and darkens, becomes sunken and leathery. Affects both the green and ripe fruit, and is more common in sandier soils.

Probable Cause
  • Calcium nutrition and water balance in the plant, aggravated by high soil salt content and fluctuating soil moisture.

Control
  • Maintain even soil moisture
  • Amend planting area with organic matter such as compost to improve water retention.
  • Avoid heavy applications of high-nitrogen fertilizer.
  • Soils that are deficient in calcium may be amended with gypsum.
Kate, for some reason I remember that you were concerned about the sandy soil where you planted your garden. If this is the case try amending your soil with gypsum which you can obtain at most nurseries. The packaging will let you know how much to add. Also try to be sure to maintain even soil moisture. If you are concerned that the soil around your tomatoes is not evenly moist then add some compost around your plants to improve the water retention. (On a side note, what is that black and white enamel(?) background on which you took this photo? It looks so cool and vintage!)

Does anyone else have some suggestions? Have you ever added gypsum to remedy this kind of problem in your home garden? How did you do it and what were the results?

Friday, July 2, 2010

We're in the News!


Yesterday we were fortunate enough to have a journalist from the The Sac Bee, Gina Kim, and her photographer, Autumn Cruz in our garden to cover our free herb harvest. To see the article online go here, otherwise read what Gina Kim wrote below. Also be sure to take in some of the stunning photos!

Our herb harvests are free and take place every few weeks or so during the summer and fall seasons. Be sure to keep in the loop by signing up for our newsletter, or following are Facebook and/or Twitter accounts. All the information can be found on our website.

In UC Davis courtyard, environment is edible

Leek plants reach up toward the sun. Artichokes peek out from their thistle-like leaves. Fragrant lavender blossoms dry radiantly on their stems.

It's just a routine day in the Good Life Garden at the University of California, Davis.

More than 100 types of flowers, fruits and vegetables have been planted in the 6,000-square-feet of organic growing space in the courtyard of the Robert Mondavi Institute for Wine and Food Science.

The garden is replanted three times a year – fall, spring and summer – and is an example of an edible garden used for decorative purposes.

"People haven't traditionally thought of a tomato plant or basil as landscape plants, but why not? You get something nice to look at and something to eat," said Sal Genito, director of buildings and grounds at Davis.

Those on the garden's e-mail list were invited Thursday to cut lavender and other herbs, the first of the year's monthly harvest days that run through the fall.

Andrea Thompson, 40, of Sacramento came armed with pruning shears and plastic bags. She harvested basil for pesto, garlic chives for scrambled eggs, sage for sweet potatoes and oregano for pasta sauce, plus a bunch of lavender and a bouquet of the daisy-like rudbeckia in yellow and orange.

"It's so motivational for a home gardener to see what's possible," said Thompson, operations director for the school's Foods for Health Institute.

The garden was planted in 2008, the same year the Mondavi institute opened. The second phase of the institute project, a brewery and winery, is expected to be completed this summer.

The garden costs about $45,000 a year to maintain, which Genito hopes to offset soon by selling produce to campus cafeterias as well as renting the space for private events and receptions.

Until a washing facility that complies with food safety standards is installed, most of the produce is donated to the Gunrock Pub and chancellor's events, as well as the Food Bank of Yolo County.

The plants mostly were started from seeds donated by the organic company Seeds of Change, said gardener Arlene Kennedy. Beyond weeding and pruning, Kennedy is also the one who shovels in chicken manure and compost into the beds between the year's three major plantings.

There are generally about 50 plants in the garden at any one time. The summer garden includes seven types of beans, two varieties of thyme, Armenian and lemon cucumber, 10 kinds of tomatoes, four types of eggplants, six varieties of peppers, three kinds of basil and four different lavenders.

Some of the plantings are experimental, like a Fuji apple tree that is being trained to grow like a grapevine for easier picking and space restrictions.

Two persimmon trees are being guided onto a trellis and will eventually be grafted together when they meet. And a handful of tomato plants in new varieties, such as the Pink Berkeley Tie-Dye Heart and Large Barred Boar – developed by the Suisun Valley-based Wild Boar Farms – are starting to sport their fruit.

Each of the garden's beds are a mix of flowers, fruits and vegetables, not just for the aesthetic contrast but because the varieties inadvertently help each other, Kennedy said.

For instance, Persian carpet zinnias attract hoverflies whose larvae eat aphids that feast on the snowy eggplants.

I think organic gardening is easier," Kennedy said. "I let nature resolve the problem."

LEARN MORE

• For more information about Good Life Garden or to get on the newsletter list for harvest day alerts go to www.goodlifegarden.ucdavis.edu.

• The garden is free and open to the public. Contact the Robert Mondavi Institute for Wine and Food Science, (530) 752-6741.

Friday, May 28, 2010

Thank You Wild Boar Farms for the Outrageous Tomatoes!


Yesterday Arlene planted the tomatoes donated to our garden from Wild Boar Farms. They are located just down the road (I-80W) in Suisun Valley. Thank you so much to Wild Boar Farms farmer Brad Gates (pictured above) for sending us the following tweet that got the ball rolling:
@goodlifegarden can I offer you some tomato plants for trial?? Locally bred and dressed to impress.
The answer of course was yes AND thank you, but then I started to dig a little deeper into that background of Wild Boar Farms. Was it a good fit for our garden? But the question, really should have been, is our garden really good enough for them!

Check out these endorsements from a couple folks you may have heard of like the staff of Alice Waters at Chez Panisse who had this to say:
"Wild Boar Farm's Tomatoes are Beautiful and Flavorful. They're Tomatoes You'll Never Forget."

AND Michael Pollan
"I grew a half dozen different Wild Boar varieties in my Berkeley garden in 2009 and they performed exceptionally well-- vigorous plants, with some unusual colors and shapes and excellent flavor."

Not bad, huh? We are really excited to see how they do here! Below is a list of the varieties that we have planted, and, where possible, links to their website where you can buy the seeds.

Pink Berkeley Tie Dye
Large Barred Boar
Black & Brown Boar
Boar King

Next year they will hopefully have starts available for larger public consumption. This year the 2,000 plants they had available sold in two days! Check out a photo of these lovlies and their rainbow of color below!


But, like Brad says, "You may buy a tomato once just because it looks cool, but you won't keep buying it unless it tastes great too." At Wild Boar Farms looks aren't enough it's all about the taste, and these tomatoes have at all!

Thursday, May 13, 2010

BEFORE and AFTER: Transition Time!

Doesn't everyone just love before & after photos? I know I do, so that's what we're bringing you today! We are transitioning to our spring/summer edibles in the garden right now! It is a little barren, but we are laying the 'ground' work for a prolific season of yummy produce by amending the soil with compost and Renovate Plus from Earthworks.

Next on our calendar, Arlene will be planting the produce we grow from seed and finally, on May 25, she, along with other UC Davis groundskeepers, will plant the starts we grow at a local nursery as well as the tomatoes that Wild Boar Farms has generously donated!

For now, here are some before and after photos for you to enjoy! Do you have any before and after photos you'd like to share? If so, please post them on our Facebook page!

BEFORE: In the before photo Arlene has just started harvesting the winter produce.


AFTER: This is what it looks like today! Slightly more barren, right?


BEFORE: This is a shot of what our artichokes looked like at the beginning of March.


AFTER: We have pruned the artichokes down to their roots. They will grow back next year! (This one already has started growing back! (Don't you love that ladybug on it!)) Over the spring/summer season okra will be planted here.

BEFORE: Here is our crimson clover patch at the height of its bloom! We planted the clover here to reintroduce the nutrients lost after growing corn in this area last summer.

AFTER: The clover was cut down and tilled back into the earth. This area is again ready to grow corn!